WiFi Setup
At the receiver, the top has a narrow hole to access the button to activate the WiFi setting mode (Fig. 3). Button is pressed with a toothpick. Sometimes an angle. When pressed felt (not heard) a click. After clicking on the button the device goes into setup mode to five (5) minutes. After this time the device automatically returns to normal operation. In setting mode the device creates the WiFi access point (network name: baozam, password: mazoab123).
- In some cases, the process of creating a WiFi access point may take up to 20 seconds.
Connect your smartphone/laptop to the WiFi «baozam» AP. At the same time, you can connect only one smartphone/laptop to the device AP.
- In this case, the laptop/smartphone can display a message about unavailability of the Internet - this should be ignored (to setup WiFi we need access to the device, not to the Internet).
- On some smartphones the mobile internet must be switched off (temporarily) to guarantee you receive the network settings from the device.
- Some smartphones don't issue about incorrect password, and just trying to connect to the device AP again and again.
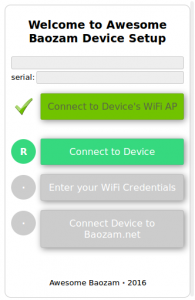
In your browser type the page address http://192.168.111.1/ of the device WiFi settings page. Follow the prompts on the page (Fig. 7).
Setting is divided into four stages (Fig. 7).
- Connecting to the device WiFi access point. In some cases, during the WiFi networks scanning and/or at the connection to the selected WiFi network, the device is forced to change the physical channel WiFi. Communication with the device may disappear and then you will need to re-connect your smartphone to the device WiFi access point.
- Connecting to the device. Information stage.
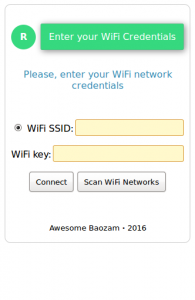
- Connecting to a WiFi network that the device will use to transmit data to the cloud. Stage has a separate screen (Fig. 8). At this point you can enter the name of your WiFi network in «WiFi SSID» field. In the «WiFi Key» - the network password. The device does not work through the open (no password) network. You can request the device to scan for available WiFi networks and show you a list («Scan WiFi Networks» button, Fig. 8), from which you can select the desired AP. When you select a network from the list the network password dialog pops up. Click «Connect» button after selecting a network and entering AP password. The device attempts to connect to the selected WiFi network.
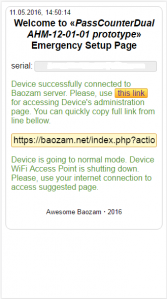
- Connecting to the cloud. In case of a successful connection to the WiFi AP the device will save the setting and display a message with the received url from the cloud (Fig. 9), otherwise an error message. Also, after the issuance of the page device will close its access point («baozam»), which will lead to reconnection of your smartphone/laptop to your WiFi network (depending on your smartphone/laptop it can take different times, tens of seconds).
- In some cases, when special rules of work on your network, the device can not connect to the cloud. Check your network settings.
- Important. The device does not passes the WiFi key in the cloud.


