Metal detector configuration
Зміст
The recommended configuration of the metal detector winding is shown in Figure 1.
The recommended winding of the metal detector should contain two concentric turns of a stranded wire with a cross section of 0.25 .. 1 mm2. The ends of the winding (Coil 1, 2) must be twisted with each other to reduce the effect of external electromagnetic radiation.
In general, the winding can be of arbitrary shape, configuration, and contain one or more turns. The parameters of the winding wiggle on the frequency of the metal detection circuit, the geometric dimensions of the winding affect the sensitivity in the detection of metal.
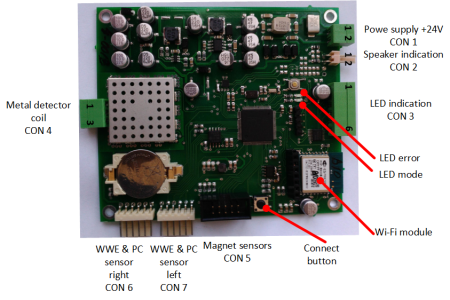
CON4: metal detector winding connection
| Pin 1 | Coil 1 |
| Pin 2 | N.C. |
| Pin 3 | Coil 2 |
- see CON4 position on Figure bellow.
"metal" parameters group
The system reacts to a moving metal in the area of the metal detector winding
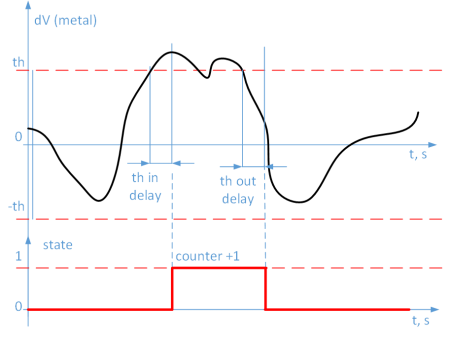
- dV - the response of the system to the metal
- th - sensitivity detection setting. The parameter values are selected based on the noise level (0.00005 .. 0.0025)
- period avr - a rough estimate of the period of oscillations in the circuit (in the system clock cycles 50..600)
- period min (ticks) - the minimum period of oscillations in the loop. For normal operation of the metal detector, it is necessary to fulfill the condition: period min < (period avr + 20..100)
- buffer size - the size of the history buffer for analysis (100 - corresponds to 1 second maximum value 250, minimum 10)
- buffer window - analysis window (50 - corresponds to 0.5 sec). The buffer size / buffer window ratio affects the speed sensitivity of the metal.
- th in delay & th out delay - time setting for detection when dV is exceeded above th and at detection loss at dV is less than th.
- state - the state of metal detection.
- counter - the the lifetime metal events counter.
Step by step Metal Detector set up
1. In general, for all devices, make sure that the electrical connections are made according to the instructions and provide the device with access to the Internet.
2. On the control page (Tuner), select the "metal" parameter group, and display the "Monitor" graphs, the remaining parameter groups can be turned off for convenient operation with the interface.
3. At the first stage, you should make sure that there is generation in the metal detecting circuit. To do this, turn on the monitoring of the variable period avr.
- The values of the variable period avr should be within the range of 50..600 units, the optimal range is 200 .. 300.
- In normal mode, the period avr should change when exposed to moving metal near the winding.
- If period avr = 0 - there are no generation in the loop. In this case, check the electrical connections of the winding, check the operation of the circuit with the recommended winding configuration, and if the result has not changed, the metal detection circuit is faulty.
- If, under the action of the metal near the winding period avr = const, a failure of the generation in the circuit occurred, possibly because of the unreliable electrical connection of the winding.
4. In the second stage, you should choose the period min (tick) < period avr for the entire range of changes, when exposed to metal. In general, the period min (tick) can be selected based on the current level of period avr using the condition
period min = period avr - Δ, Δ = 20 .. 100
After setting the period min, you should turn off the monitoring period avr and save the settings.
5. If points 1 through 4 have been successfully passed, the metal detector operates in the normal mode and the sensitivity of the detection should be adjusted.
- The sensitivity setting is performed using the variable dV, so you should enable monitoring of this variable.
- You can use the parameters th, buffer size, buffer window, th in delay & th out delay, based on their purpose, as described above. The parameter values are selected to prevent false alarms, at the current noise level and at the same time to reach the maximum detection distance of the metal compromise (Fig. 3).
- It should be noted that the range of detection of metal objects (aluminum bags) depends on their size and the speed of their movement.
- To assess the detection, you can use the state variable, and counter and / or external LED indication.
NB After the configuration, you must save the settings.
6. To ensure the joint operation of the metal detector with the radio frequency (RF) system, the noise level in the metal detecting circuit is increased, so in general, the sensitivity in the metal detecting circuit should be charged (increase the values of the parameter th).
- The level of insertion noise from the transmitting and receiving RF windings depends both on the operation principle of the RF systems and on the mutual arrangement of the boards inside the stoic and the incoming wires.
- The best compatibility of the metal detector was achieved when working together with RF pulsed-action systems with a statistical choice of the pump moments.
- Compatibility was not achieved with some RF continuous systems.
- To minimize the effect of the RF system operating in the same rack with the metal detector, it is necessary to twist the connecting wires of the windings.
7. In general, a statically metal near the metal detection winding (aluminum strut profile, electromagnetic shields, iron building structures), depending on the size and design, can reduce the sensitivity of the metal detection loop. Therefore, the best sensitivity of the metal detection loop is achieved by using non-metallic racks (plastic or acrylic).
8. The acoustomagnetic systems of the rack are located near the metal detector stand can damage the electronics on the board. This is due to the fact that, depending on the relative position and distance (electromagnetic coupling), large levels of the emf (up to 1 kV) can be generated in the winding of the metal detector.
- Therefore, these versions of the combi-shop are not compatible with acoustomagnetic systems in one rack.
- Joint work with acoustomagnetic systems can be achieved by synchronizing the metal detection loop with the pump impulses of the acoustomagnetic system.
9. The device can send information about the number of metal detector readings for a period or a message about the operation based on the counter and state variables to account for the statistics of the alarms and synchronization with the video surveillance systems.
- To do this, you need to set these variables as streams with the necessary parameters and save the changes.


